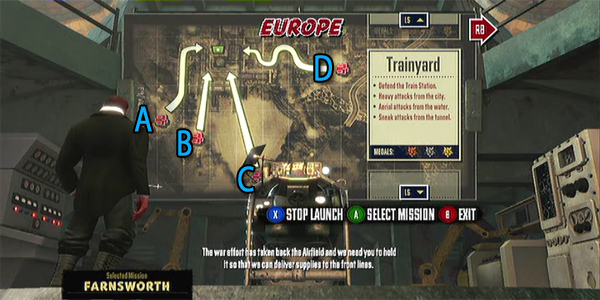
Trenched Europe Trainyard map guide
Featured in this guide
Breakers, Mortar Turrets, Grenade Launchers
Double Fine’s quick tips
Map layout
- Defend the Train Station
- Heavy Attacks from the city
- Aerial attacks from the water
- Sneak attacks from the tunnel
Recommended trench loadout
- Engineering or Assault Chassis
- Explosive Weapons
XBLAFans gold medal advice
Trainyard can be completed in multiple ways. The only requirement is that players will need to bring flak turrets or flak machine guns to take care of the aerial attacks from B and C, however there will be no aerials until wave 7 so focus your emplacements elsewhere. Other than that, using Mortars to take care of D or using grenade launchers work fine, and shotgun turrets and machine guns will make easy work of A. Use shotgun turrets at the exits of D and A combined with dampening emplacements for safety, and setup two flak turrets in the center.
If you’re using an assault chassis, you’ll have less options here, and it’s strongly recommended you bring machine gun turrets to deal with both land and air enemies; for the engineering chassis, be sure to make up for the lack of support emplacements with mortar turrets. Despite Double Fine’s tips, we recommend just sticking with the Woodruff. Manage each side, using grenade launchers to take down Breakers and other crowded up fodder and machine guns to clear the skies and this will be an easy gold.
Wave breakdown
Wave 1: Spawn D: Breakers
Wave 2: Spawn D: Resistors
Wave 3: Spawn D: Breakers
Wave 4: Spawn A: Resistors
Wave 5: Spawn D: Breakers; Spawn D: Tommys
Wave 6: Spawn A: Resistors; Spawn D: Tommys
Wave 7: Spawn B: Aerials; Spawn C: Aerials
Wave 8: Spawn A: Blitzers then Spawn A: Blitzers; Spawn A: Resistors
Wave 9: Spawn D Big Willie then Spawn A: Breakers
Wave 10: Spawn B: Aerials; Spawn C: Aerials
Wave 11: Spawn A: Aerials; Spawn B: Aerials; Spawn C: Aerials; Spawn D: Aerials
Wave 12: Spawn D: Breakers; Spawn D: Blitzers
Wave 13: Spawn D: Blitzers then Spawn C: Aerials; Spawn D: Aerials; Spawn A Blitzers
Wave 14: Spawn D: Tommys; Spawn A: Resistors
Wave 15: Spawn A: Breakers; Spawn D: Blitzers; Spawn D: Big Willie then Spawn B: Aerials; Spawn C: Aerials; Spawn D: Breakers
Dos and don’ts
Do
- use the grenade launcher frequently
- watch for aerials halfway through the mission
- apply dampeners to stop blitzers
Don’t
- stray deep into A or D
- waste bullets on breakers
Click here for more Trenched Walkthroughs and tips and Tricks


