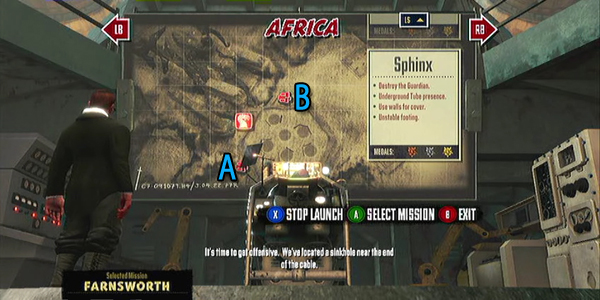
Trenched Africa Sphinx map guide
Featured in this guide
Sphinx, Gungnir, Machine Guns
Double Fine’s quick tips
Map layout
- Destroy the Guardian
- Underground Tube Presence
- Use walls for cover
- Unstable footing
Recommended Trench loadout
- Anti-Air Weapons
- Repair Crane
XBLAFans gold medal advice
XBLAFans recommended loadout
- Karlsson Chassis
- Gungnir
- Machine Guns (w/ flak)
- Machine Gun Turret and Repair Craine Emplacements
Getting gold: Defeat the Sphinx within 135s (2 minutes and 15 seconds)
By now you should be roughly level 7 depending on how many times you’ve replayed levels. Check out our the page for the Gungnir sniper cannon if you haven’t got one, as you’ll need this to get gold on pretty much every boss from now on (and the first one if you haven’t already). Luckily, this boss isn’t too difficult, just be quick.
Center Control: The map is a pretty small square littered with walls and quick sand. The map layout tips imply you should be getting cover and avoiding sand, etc. Really, all that’s necessary is to entrench with your best quickload legs and fire away at the boss. Like the last one, the tubes it sends at you are a minor nuisance. However, one big issue in this boss fight is that worms will pop up after each tier, all of which must be destroyed before the boss shows up again. True and steady aim is required here, don’t waste a single gungnir shot to ensure the best time for this runthrough. Everytime the boss comes up just pelt it with as much ammo as possible and it’ll go down quick. Regarding the safety of your own Trench, build a repair crane right next to yourself after defeating tier 1, and place MG Turrets if you have the scrap. Have them defend the middle, you can use your own weapons to take down the boss. The worms will likely destroy your crane after defeating tier 2, but don’t rebuild it just place as many MG Turrets as you can.
Boss breakdown
Tier 1: Sphinx spits out aerials to attack you, then after a while goes underground and emerges at a new side of the map.
Vulnerability: Shoot it anywhere.
Tier 2: Sphinx hurls blasts of energy at your trench after the same bit of regurgitating motion it does in the first tier, followed by the aerial spitting in Tier 1.
Vulnerability: Shoot it anywhere.
Tier 3: This time the Sphinx will be hurling blasts of energy, waves of aerials, and sending up attack worms. Again, after a couple attacks it’ll descend into the sand and change positions.
Vulnerability: Shoot it… wait for it… anywhere!
Between Tiers: After each tier a sandstorm will conveniently (or inconveniently) roll in to cloud your vision. Attack worms will show up in a circle around your trench, rotate and take them out one by one as quick as possible, they’ll descend after most of them die. There are two waves after Tier 1 and three after Tier 2.
Dos and don’ts
Do
- focus on the Sphinx
- deal with the worms between tiers quickly
- have three MG turrets up at all times
Don’t
- let the Sphinx retract into the sand
- move

