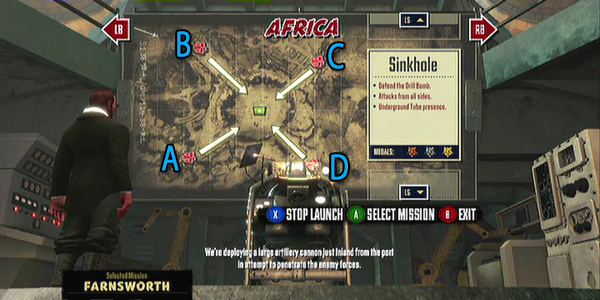
Trenched Africa Sinkhole map guide
Featured in this guide
Worms, Engineering Chassis, Mine Layers
Double Fine’s quick tips
Map layout
- Defend the Drill Bomb
- Attacks from all sides
- Underground Tube Presence
Recommended Trench loadout
- Long Range Weapons
- Machine Guns / Broadcasters
XBLAFans gold medal advice
Recommended players: 2+
XBLAFans loadout
Turtle loadout: (Any extra players recommended)
- Karlsson Chassis
- Artillery & Sniper Cannons (Baby Nasty recommended)
- Quickload legs
- Machine Gun Turret, Collection Prong
Sprinter Loadout: (Solo recommended)
- Selker Chassis
- Dual machine guns (Ripper recommended)
- Sprinting Legs
- Machine & Shotgun Turrets, Cluster Mine Layer, Sniper Turret
Getting gold
Sinkhole requires quick movement and awareness as the drill bomb is being constantly inundated. The engineering player is the key here, where-as any additional players should be using heavy weaponry from a quickload setup in the corners (if there’s only one Turtle player they may have to move more to be effective). What comes from which conduit is essentially moot, Sinkhole spits out so much scrap it’s easy to keep four MG turrets up at all times. The early game is simple, setup four machine gun turrets at the base of each lane close to the drill bomb (objective). Once they’re setup, you’ve got until wave 5 to upgrade each of them once so they can properly fend off the worm attack and all subsequent worm attacks. No matter what, keep four MG turrets at each lane up at all times, if they’re destroyed replace them immediately. Before upgrading them to level 3, place Cluster Mine Layers at each lane roughly right at the wall/opening to each lane so that the Tommys sit directly on top of them and such that the Burst Transmitters can’t hit your MG turrets without stepping over the mines. All mine layers should be level 2 before upgrading the MGs to 3, then mine layers to 3. Move rapidly to acquire scrap and always sprint when reloading your machine guns. Use the rocks/walls to avoid being sniped, and always always kill worms because they will destroy your investments and eventually hit the base. If you can keep your emplacements running, this pit will be smooth sand-sailing. If you’ve got a lot of scrap, put sniper turrets in the corners.
Wave breakdown
Wave 1: D Blitzers, A Tommys
Wave 2: A Resistors and B Burst Transmitters
Wave 3: A Resistors
Wave 4: B Resistors, Snipers on A
Wave 5: C Burst Transmitters B Blitzers A Resistors worms sprout form ground and attack, C Burst
Wave 6: Knobs on A thru D, Bertha on A the Blitzers on A, B and C
Wave 7: C Resistors and A Resistors with Snipers
Wave 8: A Burst Transmitters then B then A and C Burst
Wave 9: A Snipers, B Tommys
Wave 10: B Tommys and Burst
Wave 11: B Big Willie, B Big Willie with C Tommys
Wave 12: B Resistors and D knobs
Wave 13: B Tommys, D Tommys followed by A and C Tommys
Wave 14: B Burst A Resistors and D Blitzers then B Blitzers
Wave 15: B Bertha then B Knobs, D Bertha C Knobs, then B Bertha and B Knobs
Dos and don’ts
Do
- sprint whenever able
- use your guns whenever able
- get the turrets upgrade quickly
- clean up after your mine layers
Don’t
- ignore the worms
- have less than four MG turrets at all time
- let Bertha crush your turrets
Click here for more Trenched Walkthroughs and tips and Tricks

