
Super Meat Boy Bandage Guide: World Two

Hello and welcome, fans of old school gaming, to XBLA Fans’ Super Meat Boy Bandage Guide. Getting all the bandages in Super Meat Boy will unlock some secret characters and serve as undeniable proof of your platforming prowess. This guide will help you find whatever bandages you’ve missed, or tell you how to get that one you can’t seem to reach.
Need help on a different world? Check out our other guides:
Super Meat Boy Bandage Guide: World One
Super Meat Boy Bandage Guide: World Two
Super Meat Boy Bandage Guide: World Three
Super Meat Boy Bandage Guide: World Four
Super Meat Boy Bandage Guide: World Five

2-2: One Down
There are two ways to get this bandage. The first way is to land on top of the block that continuously barfs out syringes. From here you can either slowly walk off the edge or jump off so you can line up your fall better. The second, safer way to get the bandage is to wall jump up from below the ledge. Hold run and let go of the analog stick when you jump and you should get the height and distance necessary to snag the bandage.
![]()
2-5: Big Empty
This bandage is located in the lower right corner of the level, in the path of a fan. This bandage isn’t too tough to get, but the fan’s gust makes approaching the bandage a bit tricky. If you can’t drop down on it without the fan blowing you onto a pile of used needles, try this: wall jump from the top of the outcropping just below the first fan. Hold run for about 90% of the jump, and you should land just on the edge of the platform, underneath the bandage. From here, just jump up and ride the gust back to the start of the level.

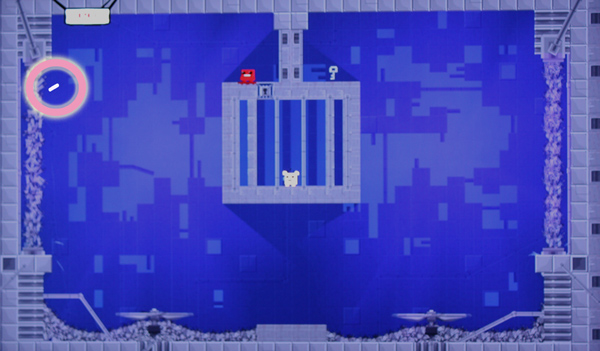
2-10: Johnny’s Cage – Bandage
This bandage takes forever to get with Meat Boy. We’d recommend using Jill, who you probably just unlocked from the warp in 2-8: The Sabbath (it’s located midway through the level, towards the top). If you have her, this bandage is really easy. Just carefully float down, grab the bandage, and float to safety. If you’re having trouble lining up your jump, you can always just slide down the wall of the needle dropper. Just remember to stop holding left once you grab the wall, or else you’ll fall into biological waste.
2-12: Above – Warp Zone (Castle Crushers)

Warp Zone: Castle Crushers 1
First of all, congratulations on making it to this warp zone, because it’s a tricky one to unlock (in 2-12: Above, you have to catch a key that drops from the left of the middle platform, which is where you’ll find the warp zone). Here the bandage is located between the two right-most saws. Just gently hop between them, grab your bandage, and hop out again. It helps if you don’t hold run and just tap the jump button while not holding any direction. If you’re still having trouble, try holding run and the direction of the wall you’re jumping from, then weave around the saws.

Warp Zone: Castle Crushers 2
This is another easy bandage. The third platform from the bottom has a solid block on its left edge. Just stand there, jump up to the bandage, and land back where you started. Again, it helps to let go of run for this jump; the added control will help with the landing.

2-13: Ulcer Pop
The bandage in this one is located in the lower right corner, behind a gate. The key is located just after Bandage Girl. This is another one of those levels where you start swearing at Bandage Girl because she keeps getting in the way.

Warp Zone: The Blood Shed 1
This warp zone is located in 2-15: Gallbladder. It’s at the top of the stage, just above the horizontal section, hiding in the background. Finding the warp zone is the hard part for this bandage. Just run past Bandage Girl and fall around the left side of the titular Blood Shed. Easy Bandage Get.

Warp Zone: The Blood Shed 3
This bandage is similar to the one in Warp Zone: Sky Pup 1-2. Just wall jump off the platform near the bandage and land back on top of it. Let go of run if you need extra control

2-16: SYNJ
You can find this bandage just above the beginning of the level. Just make a few easy jumps over the two heaps of needles and you’re home free.

2-18: Destructoid
This bandage is a bit frustrating, since it’s obvious. It’s located above the saw in the middle of the stage, but it isn’t obvious where the entryway is. There are a few blocks around the stage that look like you could pass through, but the one that’ll lead you to the bandage is towards the bottom left of the saw. Getting over to the passage is a bit tough too, since you’ll have to wait for the lasers to disappear. They do so every 20 seconds, so jump towards the passage a bit after 19 seconds and you should be fine. Once you’re inside the chamber, just wall jump over the saw to get the bandage. If you’re having trouble getting the jump down, just use Captain Video to hover above the saw. Once you’re ready to leave, there’s a passage below where you entered that leads around the back of Bandage Girl’s platform and drops you out just in front of her. Hold left when you fall out, or you’ll wind up in the lasers.

2-20: Day Breaker – Bandage
You can see this bandage from the beginning. It’s located in a small room you can access from just beyond the fan. Keep an eye out for that purple blob thing and a few piles of needles, and you’ve netted yourself another easy bandage.
Dark World

2-4X: Blown – Bandage
Jump on the fan and let it blow you up to the first platform, the one near the two vertical pieces. You should see the bandage floating over to your left. The trick here is to jump out past the bandage, then collect it as you fall back towards the level.

Warp Zone: 1977 1
The warp zone in 2-5X: Agent Orange sends you this world (it’s above the saw that’s hanging over you when you start the level). The first bandage is a bit trickier than it looks, but in actuality it’s pretty easy. Jump towards the crumbling blocks then wall jump back off. You want to break the middle blocks, but leave the bottom two in tact. Jump on top of those two remaining blocks, and you’re in a great position for jumping up to the bandage. Just don’t forget that you are, in fact, standing on a crumbling block; jump quick.

Warp Zone: 1977 3
This one’s pretty easy, both to get and to find. It’s just to your left when you start the level. Once you’ve made it to the top of the stage, you can just jump off the left side, fall for a bit, then arc back to grab onto the wall. Don’t stand against the wall for long, though, or else you’ll get shot by a giant flashing pixel.

2-6X: Cher Noble
This is another level that’s deceptively simple. The bandage is located right by the final fan, beneath Bandage Girl. All you need to do to get this is stand on the very right edge of the platform directly above the bandage, jump as high as you can, and fall down into the hole. If you’re having trouble getting past the fan’s current, try not holding run as you jump down, and holding right once you start falling.

2-7X: The Moon
Assuming you can make it to the bottom of this level, you can make it to the bandage. It’s on the left half of the stage, across from Bandage Girl. The jumps here aren’t too hard, though you will have to land on skinny blocks.

2-10X: The Kracken
Tag Jill in for this one: it’s much easier to snag the bandage than with Meat Boy. Just boost up off the fan, grab the bandage, and flutter back down.

2-12X: Grey Matter – Bandage
This bandage is hidden under Bandage Girl and behind some locked blocks. Getting the two keys isn’t hard: just avoid about 6-8 saws during a few back-and-forth runs and everything will be unlocked. The best way to get down to the bandage is to run off the platform to its right—Just watch out for those two downward-shooting saws. Getting back out once you’re down there is another challenge. There’s a one-squre block just to the left of the needle pit that makes escape a bit easier. Don’t try to walk onto it, though, because unless you’re absolutely amazing, you’ll overshoot the platform and wind up in spikes. Once you’re on that tiny platform, it’s easy to wall jump off top part of the column that’s holding up Bandage Girl’s platform.

2-15X: Insurance?
You’ll need Jill’s hovering again, if you want to avoid hours of perfecting a Meat Boy wall jump. The bandage is underneath a locked block in the top right. Once you’ve collected the key and the blocks start disappearing, wall jump up them to the point where they curl around to the left. Stay on that left portion and, when the blocks above you disappear, wall jump up to a nook in the platform above you. From here you can take your time to line up a jump, then float back down to the left. It’s very important to land on that platform on your first try, because you can’t reach it once those locked blocks have been destroyed. If you want to be fancy, you can also just wall jump off the locked blocks.

2-16X: P.S.Y.
This bandage is pretty tricky, but it doesn’t really involve anything new. You’ll once again have to jump onto a wall and then wall jump off, but this time the wall is two blocks tall and there will be a laser directly above it. The quick way to get the bandage is to hide in the ditch just before it, wait for the laser to shut off, then dashing over to it. You’ll have to jump down immediately to avoid the laser, then repeatedly wall jump off that section to keep from falling. Once the laser subsides, wall jump up to Bandage Girl. The slower, safer way to get the bandage is to jump up like you were going to Bandage Girl, but stopping in the little nook just below her. Once the laser subsides, slide down the wall below you, and hug left once you fall off. You should land on the vertical wall segment just to the left of the bandage. From here you can wait out another laser blast, then hop back up to Bandage Girl.