
Super Meat Boy Bandage Guide: World Three

Pictures by Jackie Lee
Hello and welcome, fans of old school gaming, to XBLA Fans’ Super Meat Boy Bandage Guide. Getting all the bandages in Super Meat Boy will unlock some secret characters and serve as undeniable proof of your platforming prowess. This guide will help you find whatever bandages you’ve missed, or tell you how to get that one you can’t seem to reach.
Need help on a different world? Check out our other guides:
Super Meat Boy Bandage Guide: World One
Super Meat Boy Bandage Guide: World Two
Super Meat Boy Bandage Guide: World Three
Super Meat Boy Bandage Guide: World Four
Super Meat Boy Bandage Guide: World Five

3-1: Pit Stop – Bandage
This bandage is squirreled away on top of the roof. Just wall jump up there are you should see it between two saws. Line yourself up for a quick hop and you’ll walk away one bandage richer.

3-2: The Salt Lick
All you have to do to get this bandage is be a little brave: take a jump into the open pit below where you start. Assuming you don’t hit any salt along the way, it’s an easy Bandage Get.
![]()
3-4: Transmissions
You have to unlock either Ogmo or The Kid if you want this bandage. Jump down the hole and use your second jump to get back up. Easy bandage.

Warp Zone: Cartridge Dump 1
Finding this warp zone (wait for a few seconds in 3-5: Uptown and you’ll see the key drop) is the easy part; getting this bandage is going to take a lot of trial and error. The way to get the height necessary is by wall jumping off the inside edge of one of the two single blocks. Try to jump as soon as you grab the wall, and hold back initially or else the height of your jump will come after the bandage.

Warp Zone: Cartridge Dump 3
You get this bandage the same way as the one above, only it’s significantly easier because you have a longer wall to slide down: failure doesn’t result in automatic death. Just jump onto the inside edge of one of the two walls and immediately jump off.

Warp Zone: Tunnel Vision 1
Once you’ve Commander Video’d your way to this warp zone (found in 3-7: Mind the Gap) the bandages are straightforward—if a bit tricky. The first and third levels are mirror images of each other, and both bandages require some precise wall jumping. For this first one, slide all the way to the very bottom of the wall underneath the sand blocks. You really need to save the jump for the last second or you won’t get the bandage. Be sure to hold run too, because you’ll need the extra air control to make it back to solid ground.

Warp Zone: Tunnel Vision 3
This bandage is slightly trickier than the previous one, because you need most of the sand wall in tact to climb up to bandage girl. Otherwise, the jump is the same: slide all the way down and wall jump at the last second.

3-10: Breakdown
This bandage isn’t even hidden in plain sight; it’s just in plain sight. The only tricky part is not getting shot by a missile as you grab it. Otherwise, this is a pretty straightforward bandage.

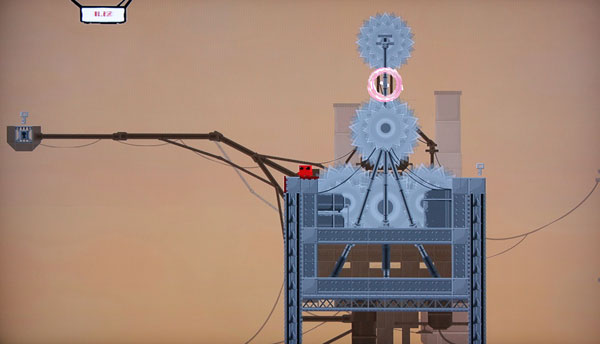
3-11: Box Tripper
This bandage is actually suspended right behind the saws. All you have to do is make it through the wall of saws. While you could thread yourself through two of the saws near the top, it’s just easier to go underneath them. Start wall jumping between two of the buildings and you should be able to get low enough to duck the bottom saw. Once you’re safely behind the saws, just find some architecture to jump off of and collect your bandage.

3-18: The Grundle
As long as you don’t mind making a short detour on your way to Bandage Girl, this bandage is a pretty easy pick-up. The little room Bandage Girl is in doesn’t have a roof once all the lock blocks are gone, so just wall jump up and run along the roof until you reach the bandage.

3-20: White Noise
This bandage requires a dodging missiles and Bandage Girl. There’s a key right behind her that you need to unlock the bandage’s little closet. Be careful when you’re getting that key, though: the missile launcher outside can still hit you in your hidey-hole and Bandage Girl won’t do much to save you from projectiles.

3-3X: The Red Room
All this bandage requires is some foresight. When you make your dash to the right, jump over both the saw and the salt pile and don’t stop jumping: you want as little of the floor to crumble as possible. When you’ve run back to the beginning of the level, thread your jump over the salt and under the saw. From here, run to the wall: you want the rest of the ground to crumble beneath you so you don’t hit your head later. Once you’ve reached the wall, just hold left and wall slide down to the bandage. Wall jumping back up to Bandage Girl shouldn’t be hard with the floor out of the way.

3-5X: Wasp
This one might look dangerous, but it really isn’t. Just make a running leap from the platform with the locked-up key. If you’re having trouble, try using Commander Video.

3-6X: Not You Again
Since this bandage is initially out of reach, you might think you need to slingshot yourself up with a conveyor. Thankfully, it’s not that hard. Stand where the first key was and jump up to the edge of the lip above you. Then wall jump up from there. If slid high enough up the lip, you should get just enough height. As an aside, if you’re having trouble with the last conveyor belt in the top right tossing you into salt, just wall jump off of it.

3-7X: Pluck
If you’ve unlocked a character with better air control than Meat Boy, such as Commander Video, Jill, or The Kid, this bandage is pretty easy. The only thing to look out for is that, since they’re slower than Meat Boy, you should avoid getting the keys at the top of the conveyors: you won’t be able to snag the falling key fast enough. Instead, just hover, glide, or double jump your way over to the keys while they’re still atop the lock blocks.
If you haven’t unlocked any of these characters, you’ll need a near-perfect conveyor fling. To get the ideal trajectory, stand at the very left edge, just above the conveyor, then jump up and very slightly left. As you fall, you want to catch the wall as soon as possible: you need to start wall sliding on the single block above the conveyor. From here, hold run and right and you should just barely clear the bottom saw. If you’re not sure you got it right, let the conveyor fling you up but don’t press a direction. At the height of your jump, check where you are in relation to the two saws. Don’t worry about falling off as you do this: you’ll automatically grab the wall again and slide back down to where you started.

Warp Zone: Kontra 2
It might be hard to access this warp zone (it’s a sprint through 3-8x: Salt Crown), but this bandage is pretty much a freebie. If you can get to Bandage Girl in this level, you can get this bandage. Just get the key in the top right and dodge missiles until all the lock blocks disappear. Once they’re gone, just avoid the saw blade and you’re set.

Warp Zone: Kontra 3
The bandage is actually right under you when you start. The key that unlocks the lock blocks is in the lower left. Just wall jump off the two vertical walls near the top of the stage and you’ll get the height necessary to grab it.

3-14X: Salmon
If you don’t have The Kid or Ogmo unlocked, this bandage is pretty close to impossible. With either of them, it’s an easy double jump to your target.

3-16X: The Chaser
As long as you’re patient, this one’s easy. Just wait for the wall of saws to sweep by, then wall jump up to the bandage. Keep wall jumping up there to dodge the saws one more time before continuing back to Bandage Girl.

3-19X: El Topo
This is a rough bandage, since it requires you to run the missile gauntlet two more times. For starters, leave as many sand blocks in tact as possible. Next step: get the key. It’s on top of the building, to the right. Once you’ve gotten the key, you’ll have to dart back inside for the bandage. The way to get this one is to jump from the right wall just right, so that you just barely poke in the bandage’s alcove. From here, jumping off the left wall should net you the bandage. Assuming you make it past the missiles, be extra super careful with the saws in the conveyor section. Losing your bandage there is sad.