
Super Meat Boy Bandage Guide: World One

Hello and welcome, fans of old school gaming, to XBLA Fans’ Super Meat Boy Bandage Guide. Getting all the bandages in Super Meat Boy will unlock some secret characters and serve as undeniable proof of your platforming prowess. This guide will help you find whatever bandages you’ve missed, or tell you how to get that one you can’t seem to reach.
Need help on a different world? Check out our other guides:
Super Meat Boy Bandage Guide: World One
Super Meat Boy Bandage Guide: World Two
Super Meat Boy Bandage Guide: World Three
Super Meat Boy Bandage Guide: World Four
Super Meat Boy Bandage Guide: World Five

1-4: Nutshell
The first bandage is pretty much a gimme. It’s located towards the middle of the level, in a dead end drop towards the right side of the screen. Just jump in and climb out. There aren’t even any obstacles to avoid.

Warp Zone: Sky Pup 1
The Sky Pup Warp Zone is found in level 1-5: Holy Mountain. The first level’s bandage is pretty easy to find. Just slide down the outside wall and you’ll see the bandage sitting on a single block. Just ease off the run button and make a slow, precise jump over to the bandage.

Warp Zone: Sky Pup 2
This bandage is also pretty simple to get. Just wall jump off the middle pillar and land on top of it. Then wall jump up the skinny passage to the bandage’s hidden bunker. This is another puzzle where it’s best to leave the run button alone; the additional control definitely helps when you’re trying to land on a single block.

1-7: Diverge
This is the first bandage that’s a bit hidden. It’s actually located a bit to the right and a screen above you. The easiest way to get this bandage is to wall jump up the outer wall and up to the platform on top. You can manage to snag the bandage when you’re jumping over the saw, but that jump is really, really hard to make. We’d instead recommend landing on top of the platform, then just running off to the left. Keep running and holding left, and you’l grab the bandage and just barely miss the saw.

1-9: Safety Third
This bandage is located on the second floor of this vertical level, between a sand wall and a saw blade. It’s just out of your reach, so you can’t just jump from the safe ground. The easiest way to get this one is to wall jump off the sand pillar to the left, and onto the one on the right. The trick here is to slide up the rightmost sand pillar and then back down again, holding right. If you slid up the wall, the sand blocks should disappear from under you as you slide back down. That will allow you to fall towards the right, through the bandage, and back onto safe ground. Just make sure you leave enough sand block in the leftmost pillar to climb up to Bandage Girl.

1-11: Fired
This bandage requires some clever jumping. As you wall jump up the sand pillars, avoid the one near the bandage. You can wall jump off the left-most sand pillar and hang left, landing on the safe ground to the right of the fire. From there, it’s easiest to jump on top of the sand pillar next to the bandage. From there, jump off the pillar, hang left so you start to slide down the pillar, then wall jump off. Once you wall jump, you want to hold the run button so you can swing all the way around to the left and land on the safe ground near the fire pit.

1-13: Tommy’s Cabin
This bandage just requires some quick reflexes. Stand on the small ledge above the first saw. Once the saw has moved to the right and out of the way, just hop down holding left so you snag the bandage. Then just hop back up to the ledge.

1-18: Altamont
The easiest way to get this bandage is by taking it slow. Make walking hops from platform to platform until you’re on the one next to the bandage. Once you’re there, you’ll want to jump down and around to the side with the bandage, then immediately wall jump off. This is a pretty tricky jump, because you have to time your jump around two rotating saws: the one tethered to your platform and the one circling the top right platform. The best way to do this is to get onto the platform’s side when the saws are pointing diagonally down and to the left (approximately the 7 o’clock position). That way when you’re jumping off that platform’s wall, the saws should be pointing to the left (9 o’clock) so you’ll just barely miss the saw on the right. Once you’ve made it to the far wall, your instinct will probably tell you to immediately wall jump up to Bandage Girl and victory, but all you’ll get is a facefull of saw and sorrow. The best thing to do is let yourself slide down the dirt wall for a few seconds and let the rightmost saw pass by. Once the saws are pointing down, you should have enough time to quickly wall jump up to Bandage Girl.

1-20: The Test
This bandage is obvious and easy. Just jump up the wall on the left and don’t get hit by saw blades. Next stop: the bandages in the Dark World.

Warp Zone: Hand Held Hack 2
This warp zone is in level 1-19: Intermission, to the left of Bandage Girl. The second level of this Warp Zone is a huge maze, with a bandage floating on the same sand platform as Bandage Girl. The basic strategy here is to get through the maze as fast as possible and, when you fall onto the sand platform, hold right. You should hit the opposite wall, which will prevent you from overshooting the bandage. Aside from that, it’s just optimizing your route to the bandage. One trick to shaving off some seconds is to make sure you don’t get hung up on corners when you’re jumping from a vertical tunnel to a horizontal one. Try to be on the opposite wall before you make the jump over.

Warp Zone: Hand Held Hack 3
This bandage isn’t hard to get, but it is hard to see. It’s towards the top of the level, in the middle of the last hall to Bandage Girl. We’d recommend waiting for the saws to fire, then running to the immediate left of the ground-mounted saw launcher closest to the bandage. There’s a one-block safe spot between the saw blades. Then just jump up, grab the bandage, and jog on over to Bandage Girl.

1-3X: BZZZZZ
Your first bandage of the Dark Wold is in this stage, and it’s a pretty basic jumping puzzle. Wall jump to the top left wall, then let yourself slide down to the last or second to last block before jumping over the saw in the middle. Make sure you hold the run button. You’ll only need to hold the jump button for a half second or so, otherwise you’ll overshoot your target. Hopefully when you land on the other side, you’ll be one bandage richer. Otherwise, it’s just a grind to get your timing right.

1-5X: Creamsoda
This bandage is a bit hard to find, but it’s not that hard to get. Climb up the vertical segment with the three wall-mounted saws, and stop once you reach flat ground. The bandage is in the shaft above you, along the left wall. Just above the bandage is a saw, so you’ll need to jump carefully. We found the best way to do this is jump up the wall on the right and let yourself slide up the wall. At the peak of your slide upwards, wall jump to the left and let yourself slide up and to the bandage. To get down, just hold right and you’ll fall back to the safe area. Don’t try to jump back down, or else you’ll end up in the saw to your right.

1-10X: Walls
This bandage is pretty straightforward. Wall jump onto the top of the right-most sand pillar and jump off again. Once the sand blocks fall, jump up into the space where they used to be, then onto the next sand pillar, grabbing the bandage along the way. From there its just one more wall jump through crumbling sand blocks until you’re at Bandage Girl.

Warp Zone: Space Boy 2
You can find this Warp Zone at the top of 1-13X: Tommy’s Condo. The second level of this warp zone is where you’ll find the first bandage. Getting it requires a wall jump and some faith. One of the easier ways to get this bandage is to land on top of the platform it’s near, then jump off and to the bandage without holding run. Once you get the bandage, hold run and cut left. You should land on the top of one of the pillars below you.

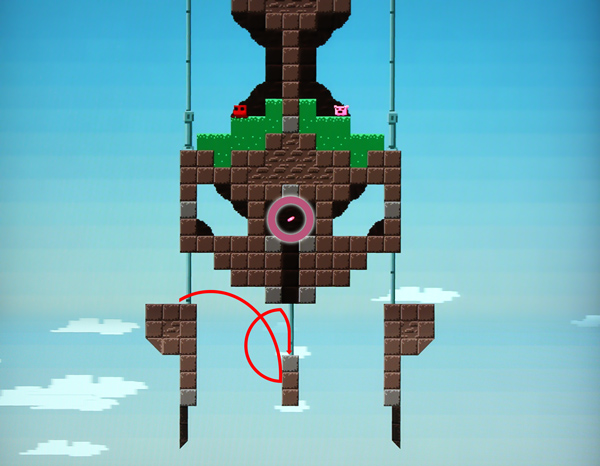
Warp Zone: Space Boy 3
This bandage also requires you to make a few difficult jumps. From the start of the level, you want to wall jump off the sand pillar to your right and onto the top of the metal pillar. From there, you just have to nail a series of jumps to a single block, culminating with a leap to the bandage. We’d recommend not using the run button for this bit of platforming.

1-14X: Mystery Spot
This bandage is pretty much impossible if you haven’t found Commander Video. He’s in the Warp Zone in 1-12: Revolve, and you need him for his hovering ability. With Commander Video, just slide down the wall and, once you’ve gotten the bandage and run out of wall, use his hover to make it back to the left.

1-15X: Kick Machine
This bandage just requires patience. We’ve found it’s best to stop right before Bandage Girl and jump over one last saw blade before hopping over her to the bandage. Just make sure you run to tag her as soon as you pick it up, because getting hit by a saw blade at that point is somewhat disheartening.

1-17X: The Clock
This bandage isn’t that bad. We’d recommend wall jumping from the left-most wall over to the right and sliding down. When you’re climbing up, the lip of Bandage Girl’s platform is a bit hard to jump around, especially when you’re trying to dodge saws. If you hold run and simply jump away from the wall without holding right, you should propel yourself outwards and upwards enough to get around it.

1-19X: The Queener
This one is a pretty anti-climactic end to World 1’s Dark World bandages. Just jump up and onto the small dirt platform before the second saw and wall jump off.