
Iron Brigade Martian Bear level guide – Settlement

Video guide
Loot
Weapons: The Perforator, Hirsch Fusor, Annihilatrix, Super Indirect Sniper, Super Shocker, Ferromagnetic Hurlant, Shock Cannon, Massive Broadcaster
Other: Knockback Shotgun, Ironclad Flak Turret, Ironclad Repair Crane, ALL Chassis, Space Cap, Brain Bucket
Double Fine’s quick tips
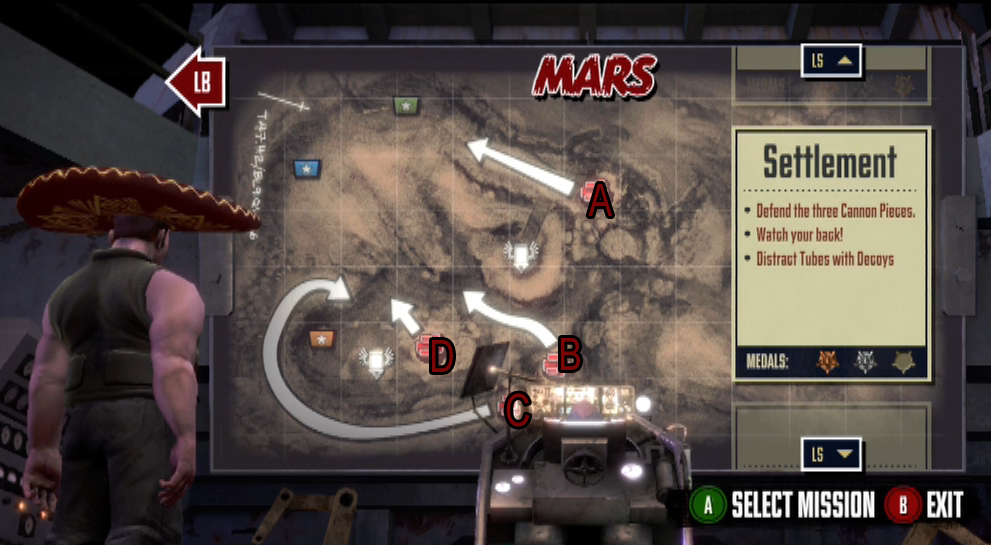
Map layout:
- Defend the three Cannon Pieces
- Watch your back!
- Distract Tubes with Decoys
- Machine Guns
- Long Range Weapons
XBLA Fans gold medal advice
XBLA Fans recommended loadout
- SNIPERS!
- Machine guns
- SNIPERS AGAIN!
- Machine guns
- Shotguns
- Dampeners
- Repair crane
- Sprinting Legs
Settlement. The single most difficult map in all of Iron Brigade history. Yeesh.
Settlement is huge, the largest ever, and it shows. Everyone will be wearing a hat for the most part, with one person sticking to Green and Blue, one person at Orange, and one person roaming. We heavily advise players not to use an Assault class or Fortify/Quickload as mobility is an incredibly important part of this map for many reasons. Let’s talk about what’s new and what to expect.
This map features Cathys, a new enemy which behaves much like Knobs but they go for players instead of towers. Ultimately they’re the most annoying thing in the universe, and, along with the massive abundance of knobs on this map, warrant a profuse employment of machine guns. Double machine guns at least at both blue and green, triple at orange (upgrade these things) just to make sure that Knobs, Cathys and let’s not forget Aerials and Noids are dealt with constantly. This is just pure base defense, we’re talking about survivability round-to-round. Supplement these machine guns with dampeners. You may not want to upgrade them, the ramps/pathways at Green and Blue are small and knobs will likely take them anyways, but orange will need upgrades for sure.
We can’t stress enough how serious it is to keep these machine guns running throughout because as a player you will likely spend lots of time hunting down Jacobs, Artys, Volt Droppers and trying to reach other players who have gone down. If you typically find yourself dying and don’t play carefully, or you don’t have a Mark V/IV (DLC version, basically) chassis you should consider a repair crane.
Beyond that, Volt Droppers are super powerful and painful here. Their damage hasn’t been altered, but since each base represents 1/3rd of your health, the VD ends up doing three times as much damage to your overall base health. That means sniper turrets, sniper rifles, sniper… snipe everything! Seriously! It’s wise to bring an engineering chassis (Selker) for almost exclusively sniper turret placement and damage control on turrets after Knobs and other jerks.
A HUGE piece of this map is the Decoys. There’s a million ways to work these, but we can’t give you solutions for everything so we’ll give you our strategy and suggestions worth exploring as well. Both of the decoys must be used, the one near Orange should be used on wave 12 or the Artys will destroy your bases. Activate it at the start of the wave then rush the Artys. If the decoy survives, great, if not, no worries. The other Decoy at green should be activated on the last wave. This one can be done with some finesse, if you have scrap place some machine gun turrets there to help deal with the mass of knobs and aerials that are going to rush that decoy. Beyond that strategy, you can have both of them HEAVILY defended and activate them long before those crucial boss waves, giving you more room for damage during boss waves. We don’t recommend activating them to counter VDs as they will hit your base anyways.
Good luck. This level is hard. Expect to lose on your first try even with our strategy. You need good loot, there’s two ways about that.
Wave breakdown
Wave 1: B: Tommies (x2)
Wave 2: A & B: Cathys, B: Cathys
Wave 3: D: Aerials & Noids
Wave 4: A: Resistors & Jacobs, B & C: Resistors
Wave 5: B & C: Cathys & Blitzers D: Aerials,
Wave 6: D: Noids, C: Tommies,
Wave 7: A: Resistors & Jacobs, Aerials
Wave 8: B: Bertha, Knobs, Cathys, C: Knobs
Wave 9: C: Tommies, D: Aerials,
Wave 10: Volt Dropper, D: Aerials, A & C: Cathys,
Wave 11: B: Resistors & Jacobs, A: Cathys, B: Cathys,
Wave 12: B: Arty & Jacobs (x2), D: Noids
Wave 13: C: Tommies, B: Tommies, A: Tommys,
Wave 14: B: Cathys & Knobs (x2)
Wave 15: A: Tommies & Arty, B: Bertha & Jacobs, Cathys, D: Noids & Aerials, Volt Dropper
Do
- SNIPERSSS!!!
- Heavily protect orange
- Build a repair crane if needed
Don’t
- Die in the middle of no where
- Activate decoys without a reason
- Bring artillery, it’s useless here