
Dungeon Defenders The Summit (level 12) guide


Strategy breakdown
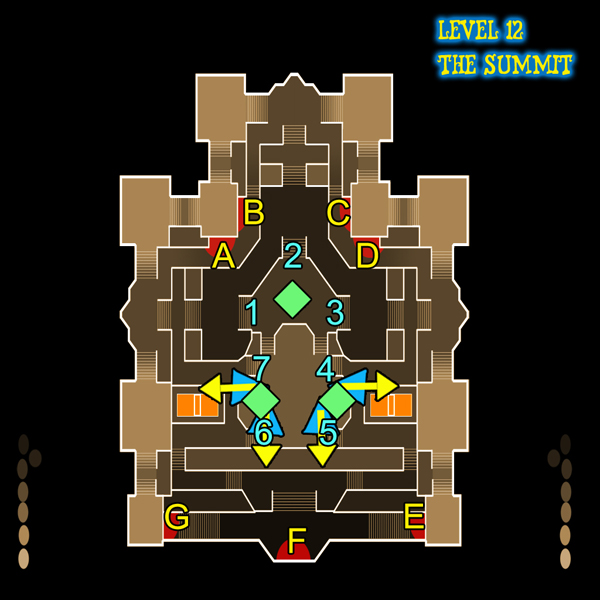
Here it is… the final (not really) level… It’s been quite the journey. Such a journey that the sun has gone down and it’s raining! Raining goblins, that is. Actually, that comes later, but for now, it’s time to save the world from all the bad things! This level has a whole whopping seven choke points, conveniently located quite close to each other. It should be noted that there are a million ways to play this level, putting defenses closer to F, having 1 and 3 go on the opposite staircase and getting rid of 7 and 4, all kinds of things, but this setup allows for easy management of tower placement and repairs. We encourage you to experiment with more ambitious and potentially time-wasting strategies. For now, watch the skies for wyverns, the ground for goblins, and your heart rate for when the boss shows up.
Guess what you should be doing first. If you said place bouncer blockades, you’d be 100% correct. 1, 2 and 3 need to be taken care of post-haste as ideally they should never have to be looked at again except for repairs once they’re fully operational. After that, take care of 4 – 7. Now be careful of placing bouncers at 4 – 7 too close to the steps, if they’re placed on the steps ogres will walk right up to them and smash everything around them, including all the towers you’re going to place on the ridge there for backup. So. Don’t do that. Put it down in the pathway, but not too far from home or warriors will make repairs difficult. There should be enough DUs for ensnare and electric auras to be placed at 1 – 3, 5 and 6. 4 and 7 only need a bouncer and a harpoon or a proximity trap, don’t waste too many DUs there.
Taking care of 1 – 3 will a case of copy-paste. Place a fireball tower between each bouncer and, provided an electric aura is up, set it and forget it. Come back now and then for repairs and upgrades. Again, don’t waste DUs decorating less-important areas. If you must, add another tower to 2 as it takes more abuse than the other two.
The real trick here (other than anti-air) are doors E, F and G. So many enemies spawn from these doors it’ll make the Squire’s pants fall off… oh wait. 6 and 5 need to be super buff, like uncomfortable to look at buff, that means bowlers, lightning and fire tower combos, and traps (inferno gas proximity) or auras (electric snare). Player hero focus should be at 5 and 6, especially when the ogres show up, and show up they will. One person will likely end up on upgrade and repair duty as eventually 1 – 3 will need some help as well, but be sure to take extra care with 5 and 6 and dedicate upgrade mana to these locations first and foremost.
Oh right, also anti-air. Well dang. If you placed fireball and lightning combos at 5 and 6, the East and West wyverns should be taken care of. If not, you’ll want to do use that combo to ensure that they are. Harpoons won’t be as effective here because the wyverns come from a high-angle. To the south of 5 and 6 are two large statues. Place ensnare auras here, then harpoon towers next to the crystals facing directly south through the auras. The Summit should be yours for the taking!
Boss Breakdown
… if there weren’t a boss after. Lo and behold, there is a boss! After the epic countdown, every person except one should be focused on the boss. Repairs will be necessary, but by now all towers should be upgraded enough, and the rest of the mana should be used for hero abilities and repairs. But mostly the former. Every hero has something to bring to the table here regarding abilities except the Huntress who makes up for it with DPS. Before the boss can be hit however, he’ll need to be shot down out of the sky, whereafter he’ll perch himself on one of the ledges across from 1, 2 and 3 at random. To shoot him down, use the war ballistae marked on your map, they’re on top of the main four castle keeps. Each bolt deals 10,000 damage to him and brings him to a perch. Once he lands, everyone should rush over there and wail on his face. Monks should use hero boost, Squires should blood rage, and Apprentices should either use manabomb or be in the back overcharge-repairing towers. The boss will rain fireballs down on heroes and towers alike if left in the sky for too long, so repairs may become more urgent suddenly.
The boss has three attacks once on the ground. One where he spits fireballs which can easily be dodged, one where he does a powerful bite attack when heroes get too close, and one where he breathes fire all over the place. Any squires all up in the boss’s grill will need to block when he pulls his head back to bite, hungry hungry hippos style. If there’s a monk with a good hero boost, they should be hardly damaged at all. However, when he’s snorting a lot and not attacking, that means the fire breath is coming. While Squires may be able to block-tank this for a while, it’s more ideal to run down the steps to the safety of 1, 2 or 3 and heal, then rush back to attack or to shoot him down again. Repeat these strategies ad nauseam until the boss is defeated and the awesome loot is acquired!
Tips & tricks
- Don’t waste DUs over-protecting choke points except 5 and 6.
- Apprentices mana bombing at F can be incredibly helpful.
- Mages should be sought out and defeated before they make 1, 2 or 3 into more of an issue than they should be.
- Be careful not to build towers too close to blockades at 5 or 6 or they could get destroyed by ogres.
- The boss will sometimes juke back and forth at a particular ballista point, be patient and predict when to fire.
- If the boss is taking too long but the defenses are perfectly fine, get some DUs back and put harpoons along the rim of the map to hit the boss.
Video Guide
Boss loot:
- Apprentice – Draconis Ignis
- Squire – Flamewarder
- Huntress – Flame Buffet
- Monk – Dragon-Crested Glaive