Fez Cube Guide – Sewers Area
It wasn’t enough to imply that this place is the sewers, they had to make the whole area green. Feels so gross after being out in the air. In fact, the ick is so intense, while down in this area Gomez won’t be able to swim, so don’t jump in the “water”. We use that term generously.
Hop around and collect the bits. Use the water valve to lower and raise the water as necessary, traversing the floating platforms as they rise and fall with the water level. Going through the door here takes you to the Sewers Hub.
First off, as always, we collect bits and do the smaller rooms first. Or at least the rooms that don’t lead us on huge adventures, because we may need things here! Right? Right. So let’s check out the door map.
All these doors are on different pillars and at different water levels, so starting from the bottom and working your way up is a good idea. However, since we’re silly, we started at the top!
The door here in the Sewers marked “Shift Passage” is super duper important, but there’s nothing to do there (besides get a bit) until you’ve figured out the Shift Cipher. Figure that out, then come back here and head down to the SPOILER ZONE.
Moving on then, let’s go get the QR Code.
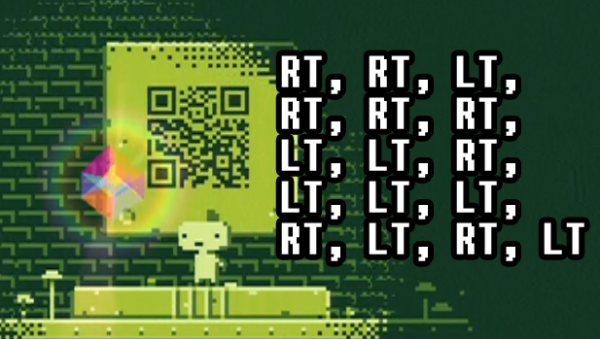
Anti-Cube QR: Through a door straight off the hub we’ve got another QR code to do. Be careful not to contaminate the code with the darkness of the sewers. You’re welcome to take a picture and figure it out, or… here’s the code:
RT, RT, LT, RT, RT, RT, LT, LT, RT, LT, LT, LT, RT, LT, RT, LT
Once we’re done here, let’s head back to the hub. Next up is the puzzle room!
This place is a fun puzzle, and as with all puzzles, we recommend you give it a shot on your own first. If you’re not interested, we of course have the solution below.
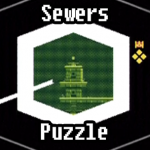
Puzzle Cube – While it may look different because we’re in the land of Fez, this is a pretty common water puzzle. The key here is to move the platform such that it will be under the vines, rather than on the opposite side. To do this, we’re going to have to play with the sewage sludge.
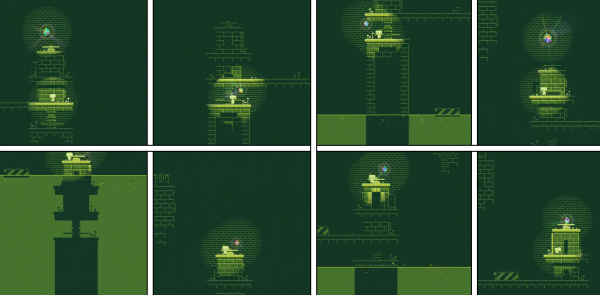
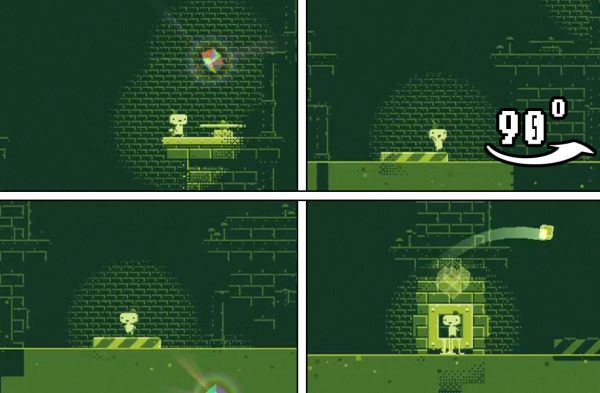
Step 1 is to lower the water down below the shifting platform. This way you can jump down there and rotate the platform. Rotate it such that it’s under the platform with the treasure chest. Essentially any direction works, but if you need specifics follow the picture below.
Once you’ve rotated the platform, climb back up and raise the water. If you’re following our picture, you’ll have to raise the water to the very top. The goal is to get the floating platform to rest on top of the pivoted platform. Once you’ve managed that, align the pivoting platform under the chest and raise the water back up to the top again. From here you should be able to make the jump onto the vines, then climb up to the top to grab a cube.
This puzzle is a little complicated when it comes to rotations and when you started. It’s easiest to match the picture and rotate based on that, but as long as you get the floating platform to land on the pivoting one, the rest is easy.
Key – After all that huffing and puffing and puzzle solving, let’s go do something easy! Hop on into the Key room and, well, grab the key! It’s two jumps away.
Now that we’ve covered all the small-time doors, it’s time for some adventuring.
Let’s head to the Hideaway door now as it’s our first big venture into the Sewers. It’s a good thing smell isn’t a dimension, huh? (or is it)
Through this door we’ve got some actual levels to complete here, but mostly all sorts of rooms with cubes to find, all of which are hidden away. Hence the clever nomenclature. For starters, there are bits, so let’s grab those. Simply hop along the platforms as they shoot up from the sludge to make it across to the other side. Snag the bit there, then head through the door.
In here we have a locked door and a bit of a puzzle to complete. We can head through the locked door now if you have a key, if not don’t fret because one is coming up.
Inside the locked room we have a bit atop a pipe-laden structure and a massive tuning fork. That means it’s time for a Rumble Puzzle.
Rumble Anti-Cube – If you haven’t had to do one yet, Rumble Puzzles are codes sent to you via the left and right rumble packs in your controller. If the rumble is turned off, turn it on now. Or you could just read our code. Since it’s difficult to know where the code starts and stops, here’s what we put in:
LT, LT, LT, RT, LT, RT, LT, RT, LT, LT
Pick up your prize, you’ve earned it. More or less.
Returning to Hideaway 2 we’ve got to get to the top of this room somehow. Head back to the entrance and rotate until you find the vines on the back. In the dankness of the Sewers they look like little repeating squares. Climb up those then raise the water level as high as you can.
From there, hop on the platform then to the center piece. Depending on which way you were facing when you made the jump, rotate to bring the platform to the other side, then cross there. There’s a bit here and another door we’re going to go through.
Once you’ve made it across, head through that door.
Key – This key’s pretty easy to get, just a jump to the right and a rotate to the right three times and then bam: key. Enjoy it. Head back to Hideaway 2 the way you came.
As per the usual we’ll have to climb higher, then raise the water level. This time the vines are hidden on the center platform, so climb up there and work your magic on the valve. On one side there’s some more vines to climb, and another valve to turn. However, this time we’re not turning it all the way up.
Bit – The key to this bit is to raise the water level until it’s two notches below the top. Then, hop onto the platform, rotate right, then jump onto the small notch where the bit is hiding.
After that, return to the valve, raise the water to its max and make your way to the last door.
Cube – For your efforts thus-far, you get a cube! Without much effort beyond arriving at the room.
Let’s warp back to the Sewers Hub and end this dank, stanky journey. Here are some options:
– To Industrial Zone
– To Mausoleum
– To Main Hub
– To Observatory
!! – SPOILER ALERT – !!
Now that we’ve got the Shift Cipher, let’s head through the Shift Passage door as marked on your door map. Putting this code in isn’t just for an Anti-Cube, no, there’s actually a bit more journeying to do once you’re in here.
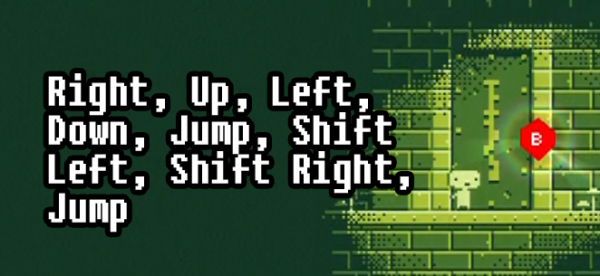
Shift Puzzle – This one’s a pretty simple code, just as long as you manage to keep the whole code in-view. Don’t be fooled by the first bits. In case you are, here’s the code:
Right, Up, Left, Down, Jump, Shift Left, Shift Right, Jump
Putting the code in lowers the slab upon which the code is imprinted, giving us another door to venture through. Head through it and enter… the Foundry!
How could we not pause dramatically for this place? IT’S SUPER RED! How cool. Let’s get down to business.
There are two things to do in this gravely dangerous place (don’t try to swim here either) and the first thing happens to be a door. It’s shares a platform with the entrance, just spin around until you find it, then enter it.
Rumble Anti-Cube – These are always fun. As always, turn on that rumble and feel the code! Here’s what we entered:
LT, LT, RT, LT, LT, RT, RT, RT
Grab your anti-cube and get back to the scary parts.
Getting to the Top – Like some other areas we’ve seen before, this gauntlet-esque puzzle is one part platforming and timing, one part rotation. The moment you turn that valve, the boiling water/lava/death screen will start rising, so you’ll have to climb for your life. We’ll guide you with pictures through the tough parts where you may or may not be dying horribly.
Turn the valve to start the lava flow. You just have to turn it once, once you do immediately start climbing that ladder. Find the mesh ropes on the small platform and make your way up the next ladder to the larger series of ropes. From here, things get a little tricky.
Rope Sprint 1 – Every time touch those scary looking bars, you’ll get fried. Our advice, thus, is to avoid them at all costs. Doing this is simpler than it feels given the gravity of the situation: climb as high as you can on each rope section, then rotate right.

After that sprint, there’s some platforming sprints centered around the rotating blocks that are a little tough, but assuming you make it up to those you’ll reach a checkpoint.
From here, there’s a floating platform you’ll stand on as the lava (we’re going to call it lava) rises, so you don’t have any margin for error here. Luckily, there isn’t much to this last bit. Just wait until you’re right up against that first bar, then rotate right. From there, it’s an easy float to the top.
Anti-Cube – Once you make it through the door on the top, grab your anti-cube as your reward and warp back to Sewers Hub.
Now that we’re done here, we’re done in all of the Sewers! There’s really nothing left to do, you’re good to go, you never have to come back. Enjoy.
– To Industrial Zone
– To Mausoleum
– To Main Hub
– To Observatory

