
Iron Brigade Martian Bear level guide – Mars Landing

Video guide
Loot
Weapons: Master Blaster, Crater Creator, Standard Pistol, Hirsch Fusor, Annihilatrix, Spurt Rifle, Super Shocker, Smasher, Shock Cannon, Massive Broadcaster.
Other: Knockback Shotgun Turret, Massive Flak Turret, Ironclad Repair Crane, Ironclad Sniper Turret, Ironclad Mortar Turret, Selker V, Honeychurch IV, Hamer IV, McGarry IV, Space Cap
Double Fine’s quick tips
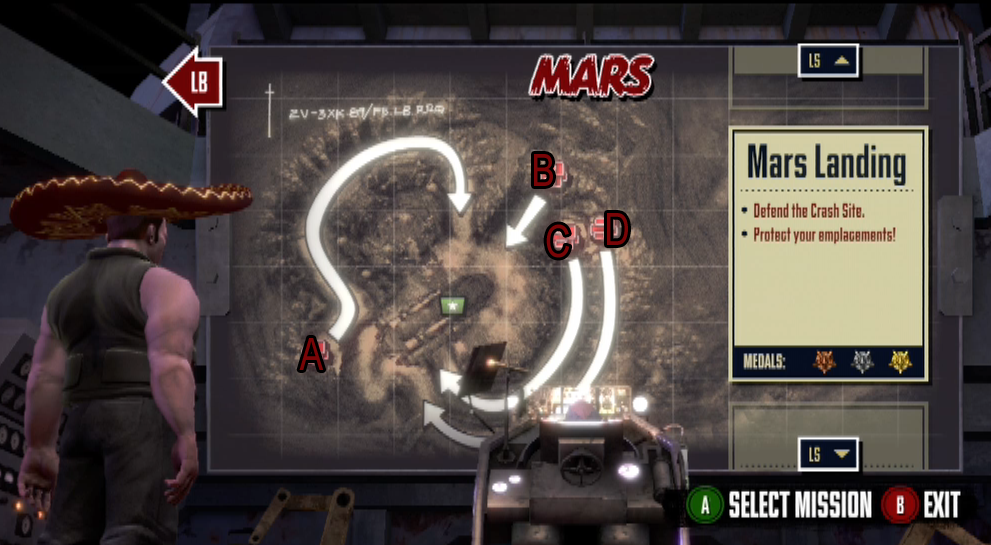
Map layout:
- Defend the Crash Site.
- Protect your emplacements!
- Explosive Weapons
- Ionized Collection Prong
XBLA Fans gold medal advice
XBLA Fans recommended loadout
- Snipers
- Grenade Launchers
- Shotguns
- Shotguns
- Mine layers
- Mortars
Here we are on Mars! Everything’s so red and pretty, right? Let’s get down to brass tacks. The big key to Mars Landing is defending two central locations: where A and B collide, and where C and D collide. All throughout the base from B to the end of C’s path will need shotguns. Resistors will line up along the ship if they get through, so it’s important to keep the damage on them and spread evenly. The reason we’re taking shotguns here instead of machine guns for core base defense is the lack of draw for most of the map, machine guns won’t have much time to layer on damage due to lots of map obstructions, so it’s better to have the damage high and concentrated.
Beyond base defense there are those tricky situations, yes? Breakers and Amplifiers pour out of B, so it’s important to put a mine layer on B the round before or during the first Amplifier (Wave 8). Eventually, one should go on A as well (near the base) and at the collision of C and D, and along D where the Tommys fire from (just across the open space behind the base, you’ll notice a break along the ledge). A mortar between A and B, and overlooking C (in the aforementioned open space) makes for great extra damage, but isn’t necessary if you don’t have the scrap.
There aren’t THAT many Jacobs on this map, but do be sure to take them out. Luckily there’s no Knobs or aerials, so shotguns are incredibly potent here and we encourage bringing things that do tons of damage. There’s not much room to damage enemies before they get to the base unless you bring snipers, so be sure to bring things with shock if you have any. Always search out and destroy burst transmitters and Amplifiers as they’ll be a big issue here, but for the most part this map shouldn’t be too tough as long as your base defenses are potent.
Wave breakdown
Wave 1: A: Resistors, C & D: Blitzers,
Wave 2: D: Resistors & Tommys,
Wave 3: D: Snipe Tuners, C: Resistors, A: Resistors,
Wave 4: C: Breakers, Blitzers, A: Resistors,
Wave 5: D: Tommys, C: Resistors & Jacobs,
Wave 6: C: Burst Transmitter, D: Snipe Tuners,
Wave 7: C & D: Breakers, A: Breakers, D: Blitzers
Wave 8: B: Amplifier, Burst Transmitters C: Resistors
Wave 9: B: Breakers (x2) C: Resistors & Jacobs (x2)
Wave 10: D: Snipe Tuners, Tommys, C: Resistors
Wave 11: D: Big Willie & Jacobs, A: Resistors
Wave 12: C & A: Blitzers, B: Breakers
Wave 13: B: Amplifier, Burst Transmitters, D: Tommys, A: Resistors,
Wave 14: A, B & C: Burst Transmitters, D: Resistors
Wave 15: B: Amplifier, C: Willie & Jacobs, A: Willie & Jacobs, B: Amplifier, A: Resistors
Do
- Lay several shotguns along the base
- Build early coverage on D for Tommys
- Stop Amplifiers and breakers at B
Don’t
- Run too far from the base
- Over-protect B, one mine layer is fine
- Upgrade mortars, level 1 will suffice