
Dungeon Defenders Endless Spires (level 11) guide


Strategy breakdown
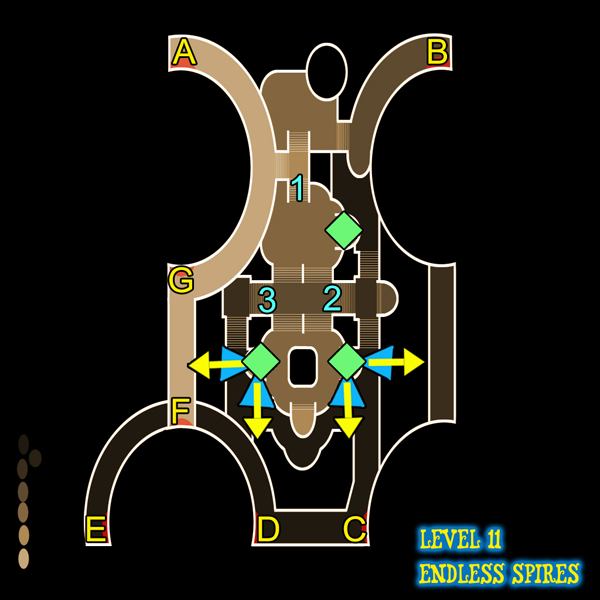
Another level with just three choke points, huzzah! Oh, but wait, it’s a lot harder. This level’s tough, 1 will require constant attention and a lot of DUs will be spent on anti-air, but awesome hero cohesion and teamwork will save the day here. The precarious location is part of what makes it so difficult, but luckily 2 and 3 can be managed well with a hero each so the other player(s) can focus on 1. No matter how many players there are, 1 takes precedence over all other choke points. Managing DUs will be tough, but rest assured they should go to anti-air and 1 above all else.
Unfortunately for Apprentices out there we can’t mess around with magic blockades at 1, they won’t hold, so go with bouncers up there at the very top of the stairs. 2 and 3 can use magic blockades, and in fact it might be a better idea for DU conservation. While similar, 2 and 3 have one big difference in that 3 can be defended one set of steps lower due to having only one direction of traffic. If ideal, setup there with a blockade and a bowler. Later a gas trap can be added to make the bowler even more awesome. At 2, however, there are two sides to watch, so build at the choke point with any sort of blockades and two bowlers. Belive it or not, this is going to be a very lethal setup. Combine it with auras rather than traps since the lane is so wide, ensnare and electric should be enough here. Using enrage would work as well as it’ll get enemies to stop moving.
Now for the big one, 1. This choke point will be subject to a few ogres, mages, and will be a constant source of warrior-woes. It’s tempting to put a slice n dice up there, and it’ll work, but someone with high casting speed will have to babysit it. Back this choke point up with a lightning tower and fireball tower combo for sure, but the best will be traps AND auras. Ensnare, electric, proximity, gas, inferno, all are really useful here, especially ensnare auras and gas traps. Have at least one person here all the time and watch out for warriors. A Huntress is almost necessary for this level, especially since they can go invisible and take out the mages, of which there will be many.
Provided the defenses at 1 hold, the last bit of sadness comes from profuse wyvern attacks. Thankfully they come from the East, West and South in predictable fashion diving straight at the lower crystals. Harpoons should work here, but it’s safer to put fireballs on the marks we put on the map and back them up with a lightning tower since electric auras can’t be placed that close to the crystal.
Tips & tricks
- Watch 1 constantly, ogres and mages will bring the punishment and warriors will keep players at bay.
- 2 and 3 shouldn’t be that big of an issue except for the ogre or two that may spawn there, so try not to waste DUs over-protecting that area.
- A Huntress is really helpful for this level, bring one if possible with good traps
- Due to the high volume of enemies at 1, use magic towers rather than squire towers for splash damage
Video Guide