
Dungeon Defenders Servants Quarters (level 5) guide


Strategy breakdown
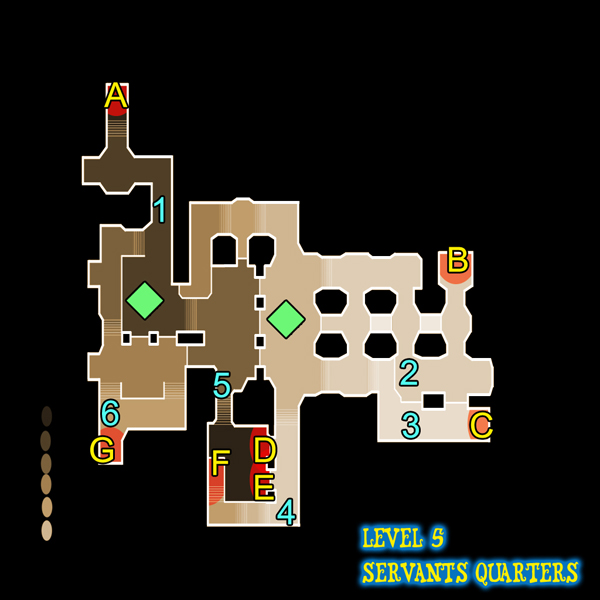
WHOA! Two crystals? Wait wait, don’t quit, you can do this. Hm… it’s asymmetrical!? Still possible, believe it or not. Servants Quarters is the first level in Area 2 (levels 5 – 8) wherein there are two crystals to defend now. This level looks mind boggling and confusing, is full of steps and ridges and tables but it’s a lot less confusing than it looks. Mages show up here though, they heal all the enemies around them and can summon skeletons whom they can bring back to life over and over until they die. These mages will eat up auras with their skeleton rushes and use up traps, so make sure to kill them before they run your defenses ragged.
Each choke point is a little different, so make sure to pay close attention to the path enemies take. 1 will be easy, just place a spike blockade there with an electric aura and fire tower combo. Check back periodically to take care of the mages which will spawn there constantly. 2 is really, really easy: place a spike blockade between the pillars there and a trap trifecta (inferno, gas and proximity) in front of it (towards 3, not towards the north). 3, 4 and 5 all take bouncer blockades, so they’re setup pretty easily.
3 and 2 will be assisted by ensnare and electric auras placed between the two to hit both pathways and a harpoon turret on the stairs which will pierce enemies all the way down 2. 4 just needs a bouncer and harpoon combo. Place the bouncer on the middle flight of steps so a harpoon can be placed behind it which will shoot at enemies from F as well as E and D. Lastly, a bowler behind 5 and another trap trifecta will suffice for a setup there, but ensnare and electric auras will be very helpful as a lot of enemies spawn down there.
Lastly is 6, which is a bit of a strange cause. A bouncer is perfect here, but it has to be back far enough so enemies won’t be invincible when they attack it. However, it will also need a magic blockade or spike blockade on top of the tables (but not such that it gets attacked by enemies) so bounced enemies that don’t die don’t skip the path and go to the crystal. Put ensnare and electric auras here just in case 6 gets out of hand. Any sort of powerful tower like a harpoon or fire tower will help here.
Tips & tricks
- Mages will constantly bombard check point 1, so hunt them down before they overrun the defenses there.
- Be careful with 6, enemies might spill over the table, it’s not a bad idea to backup the pathway with a spike blockade.
- 4 can get overrun pretty easily if it doesn’t get backup, make sure the tower supporting the blockade is powerful.
- 2, 3 and 5 will take a massive amount of regular-unit attacks, so heroes should spend most of their time repairing and attacking here.
Video Guide